Return to Spotlight Page
Tough Endurance
Kansas City, Missouri
LONDON SYSTEM
| White | Black |
|---|---|
| 1. d4 | Nf6 |
| 2. Bf4 | g6 |
| 3. e3 | Bg7 |
| 4. Be2 | 0-0 |
| 5. h3 | c5 |
The London System is a flexible method for White to open, and it can meet virtually any setup Black chooses to make. Black chooses a standard "Indian"-type setup and doesn't commit any pawns to the center to see how White deploys his own forces. Black's last move at last declares his intentions.
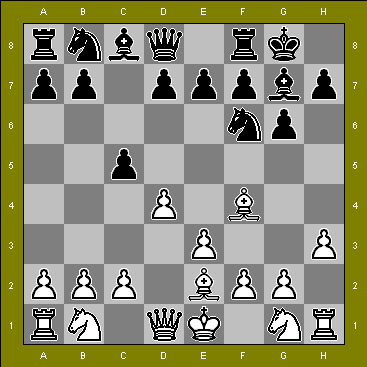
Position after 5. . . . c5
| 6. c3 | ------ |
Montecatini-Terme, Italy, 1998, continued . . . 6. ... b6 7. Nf3 Bb7 8. Nbd2 d6 9. 0-0 Nc6 10. Bh2 Re8 11. a4 cxd4 (and Black won after a short, sharp struggle).
| 6. ---- | Qb6 |
| 7. Qb3 | d6 |
| 8. Nd2 | Nc6 |
| 9.Ngf3 | ------ |
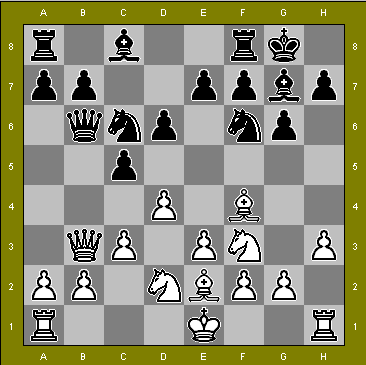
Position after 9. Ngf3
Here Black can try 9. . . . Be6 as it places White in an uncomfortable situation, i.e., 10. Qxb6 axb6 and best now would be 11. 0-0 to get the h1 Rook into play. Attempts to save the a-pawn causes problems--11. b3 allows ...Nd5 while 11. a3 Na5! and the b3 square is a glaring weakness. Black, instead, plays:
| 9. ------ | Nd7 |
| 10. Bh2 | Kh8 |
| 11. 0-0 | h6 |
| 12. Nc4 | Qxb3 |
| 13. axb3 | a6 |
| 14.Ncd2? | ------ |
This wastes two tempi, and Andrew felt this was probably the reason for the middlegame complexities.
| 14. ------ | f5 |
| 15. Rfd1 | b6 |
| 16.Nc4 | b5 |
| 17.Na5 | Nxa5 |
| 18.Rxa5 | Bb7 |
| 19. Ne1 | ----- |
White wants to challenge Black's powerful Bishop at b7, and perhaps put his Knight on a more useful square.
| 19. ----- | Rad8 |
| 20. Bf3 | Bc8 |
| 21. Nc2 | Nb6 |
| 22. Raa1 | ---- |
Here White could try for a win of the exchange with 22. dxc5!, and if Black replies ... dxc5, then 23. Rxd8 Rxd8 24. Bc7! wins material.
| 22. ------ | e5 |
| 23. dxe5 | dxe5 |
| 24. Kf1 | c4 |
| 25. b4 | Na4 |
| 26. Ra2 | g5 |
| 27. Ke1 | ------- |
A difficult move for White to make, but here it is hard to know exactly what to do. Black has succeeded in acquiring most of the space, and restricting the movement of White's pieces. An attack seems to be looming on White's kingside. But White wisely refrains from playing the tempting-looking 27. g4 Rxd1+ 28. Bxd1 f4 29. Ke2 Bb7! and Black is winning. As it is, placing the White King on e1 allows a combination by Black.
| 27. ----- | e4 |
| 28. Be2 | Nxb2! |
| 29. Rxd8 | ------- |
White can't take the Knight: 29. Rxb2? Bxc3+
| 29. ------ | Rxd8 |
| 30. Nd4 | ------ |
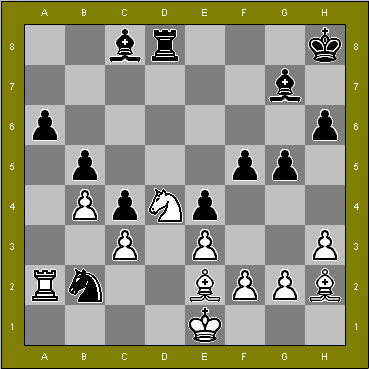
Position after 30. Nd4
| 30. ---- | Na5 |
Here, Black's Knight attacks the c3 square and block's the white Rook from attacking the a6 pawn should his white square Bishop need to move elsewhere, but it seems better here for Black to play 30. ... Nd6+! This would place the black Knight in white's prime real-estate and exert influence over a wide range of white's territory. White must then play 31. Kf1 (not 31. Bxd3? because exd3 would leave White defenseless on the white squares and give Black a passed pawn). After 31. Kf1, play might continue Kh7 32. Ra5 Rd5 33. Bh5 f4 34. Ke2 Bb7 exf4 and gxf4.
| 31. Kd2 | f4 |
| 32.Bxc4 | Be5 |
Instead, Black should try 32. ... Nxc3 33. Kxc3 bxc4 34. Ra1 (not 34. Kxc4 Bxd4 35. exd4 Be6+) Bb7 35. Kxc4 Rc8 36. Kb3 Bd5 37. Kb2 Rc4 38. Rxa6 Rxb4+ 39. Kc1 Bxd4 40. exd4 Rxd4. The position is complicated, and under tournament conditions, such continuations are not easily seen! Undaunted, Andrew grips his position hard and presses forward, unwilling to let his opponent, a highly rated Expert, win! As any experienced chess player can tell you, it is not enough to have a "won position". You must also win the game! This Black fails to do. To his credit, Andrew defended vigorously, and summoned the needed energy to turn the tables.
| 33. Kc2 | Bxd4? |
| 34.cxd4 | Rf8 |
| 35. Bg1 | fxe3 |
| 36. fxe3 | bxc4 |
| 37. Rxa4 | Rf1 |
| 38. Bh2 | Rf2+ |
| 39. Kc3 | Rxg2 |
| 40 Be5+ | Kh7 |
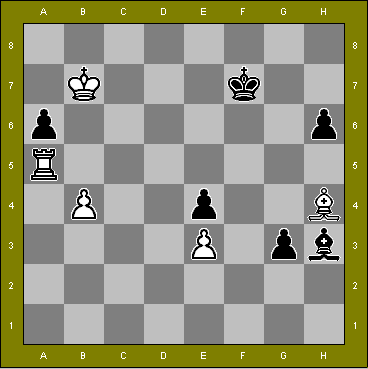
| 41.Kxc4 | ------ |
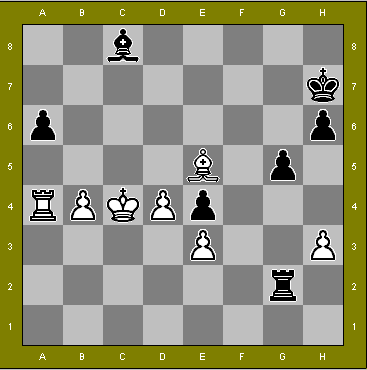
Position after 41. Kxc4
The smoke has cleared and it is Andrew that has the passed pawn, the powerfully centralized Bishop and King, and now it is Black that must fight to save his game.
| 41.----- | Rc2+ |
| 42. Kd5 | Bb7+ |
| 43. Ke6 | Rc6+ |
| 44. Bd6 | Kg6 |
| 45. d5 | Bc8+ |
| 46. Ke7 | Rb6 |
| 47. Ra5 | Bxh3 |
| 48. Bc7 | Rf6 |
| 49. d6 | Re6+ |
| 50. Kd7 | Kf7 |
| 51. Kc6 | g4 |
| 52. Kd5 | Rg6 |
| 53. d7 | Rg5+ |
| 54. Kc6 | Rg6+ |
| 55. Kb7 | Rg8 |
| 56 d8 Q | Rxd8 |
| 57 Bxd8 | g3 |
| 58. Bh4 | Resigns |
Position after 58. Bh4