A Portent of Things To Come . . .
Vancouver's Stephen Pick traveled to Spokane to play in the 5th Annual Dave Collyer Memorial Chess Tournament, consisting mostly of adult chess players. While at the tournament, Stephen turned twelve years old. A look at the below game shows that Stephen is playing chess that is far above average for someone his age!
DAVE COLLYER MEMORIAL CHESS TOURNAMENT
February 25, 2001, Spokane, Washington, Round 4
White: Stephen Pick (1407) Black: David Rowles (1791)
FRENCH DEFENSE; Exchange Variation
| White |
Black |
| 1. e4 | e6 |
| 2. d4 | d5 |
| 3. exd5 | exd5 |
Black plays the French Defense, and Stephen declares its course by playing the "exchange variation". In this variation, white relieves the tension in the center for a few moves by exchanging central pawns. This also opens the position and will almost certainly make for wide-open piece play.
| 4. Nf3 | Bd6 |
| 5. c4 | c6 |
| 6. Nc3 | Ne7 |
| 7. Bd3 | dxc4 |
| 8. Bxc4 | O-O |
| 9. O-O | Bg4 |
| 10. Ne4 | Bc7 |
Black wisely prefers to keep his dark-squared Bishop, and why not? It sits on a good diagonal--one that looks down menacingly on White's King. Also, by moving the Bishop off the d-file, he uncovers a threat against White's d-pawn with his Queen. With his next move, Stephen sets a subtle trap.

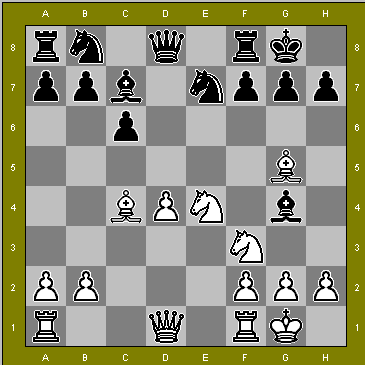
Position after 11. Bg5
So far, this game follows G. Kuzmin--Y. Kruppa (Berlin, 1997), which continued: 11. ... Kh8 12. Bh4 f6 13. Qb3 Nd7 14. Bg3 Nb6 15. Nc5 Nxc4 16. Qxc4 Rb8. After some tense moments, the game was later drawn. With Stephen's last move, playing his Bishop to g5, he makes an invitation for Black to "win" the d-pawn--an invitation that Black dare not accept! White gets a heavy attack in any line. For example, after: 11. ... Bxf3 12. Qxf3 Qxd4 13. Bxe7. If Black now plays 13. ... Qxc4 14. Qg4! and Black better make sure his insurance is paid up! 14. ... Qe6 15. Nf6+ Kh8 16. Bxf8 Qxf6 17. Bxg7+ Qxg7 and 18. Qc8+ gives White a won game. So Black wisely chose to develop his Knight, and mobilize his forces.
Black moves his Knight to a good square, where it can both attack White's Bishop and support putting a Knight on d5. With Black's rooks connected, he can breathe easier, right? Not really, as White now moves to exploit weaknesses in Black's position.
Unleashing complications. Complications flow naturally from "open" positions, where pieces range freely over the board.

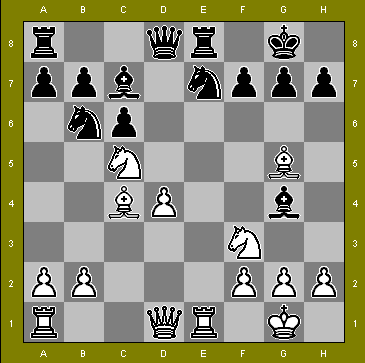
Position after 13. .... Re8
Here White also had the option of playing 14. Bb3, preserving the Bishop on a great diagonal. Also, White could have tried the enterprising 14. Bxf7+ Kxf7 15. Bxe7 Rxe7 16. Ng5+ Kg8 17. Qxg4, attacking Black's white squares.
| 14. ---- | Qb8 |
| 15 Rxe7 | Rxe7 |
| 16 Bxe7 | Nxc4 |
| 17. Qb3 | Bxf3 |
| 18. gxf3 | Nd2 |
| 19. Qd3 | Qxb7 |
| 20 Qxd2 | Bxh2+ |
| 21 Kxh2 | Qxe7 |
| 22. Rg1! | ------- |

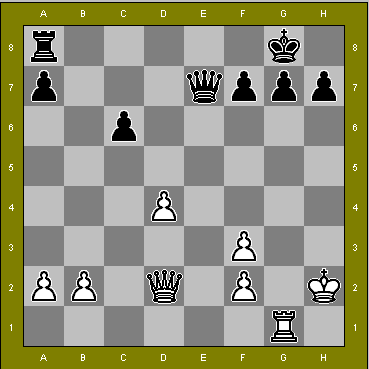
Position after 22. Rg1!
White prefers a more active defense. He knows Black will attack his d-pawn, so the question arises--how to defend the pawn? White could play Rd1, but why not put the rook where it can defend the pawn and take an active role in defending the unsheltered
white King at the same time? In addition, a white Rook on the g-file exerts pressure on Black's King.
| 22. ------ | Rd8 |
| 23. Rg4 | g6 |
| 24. Re4 | Qd6+ |
| 25. Kg2 | c5 |
| 26. d5 | ------- |
White is hoping Black will fall for the trap, and take his d-pawn immediately. If 26. ... Qxd5?? 27. Re8+ Kg7 28. Rxd8 nets a Rook!
| 26. ----- | Kg7 |
| 27. Rh4 | h5 |
| 28. Ra4 |
Do you see how much more active White's Rook is than it would have been if it had been moved to the d1 square back on move 22? A good chessplayer always tries to create problems for his or her opponent.
| 28. ------- | Rd7 |
| 29. Qc3+ | Kh7 |
| 30. Ra5 | Rc7 |
| 31. Qd3 | Kg7 |
| 32. Ra6 | Qd8 |
| 33. Qc3+ | Kg8 |
| 34. Qe5 |
White now commands the board. Besides having an advanced passed pawn, White's pieces are in Black's territory, and threats are looming against the
black King. White will now create too many problems for Black to solve.

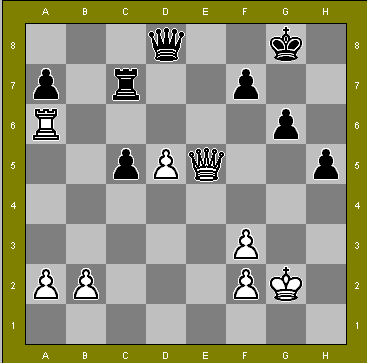
Position after 34. Qe5
Black had to stop White from playing d6, forking the Rook and Queen.
White pauses his attack to check his "back door", potentially stopping the Black Queen from taking the a-pawn if White moves his Rook off the a-file, or from taking the b-pawn if Black's Queen should move to the a1-h8 diagonal.
| 37. ------ | Qd5 |
| 38. Qf6 | Qd3 |
| 39. Rc6 | Qd4 |
| 40. Rc8+ | Kh7 |
41. Rh8
Mate |
White succeeded in winning this game because he was alert to weaknesses in Black's position, and looked deeply to find ways to penetrate his opponent's camp. White developed his pieces quickly and harmoniously, and continually avoided making mistakes. The moral: give every move 100% of your effort.
Return to Spotlight Page
