A Modern David vs. Goliath Struggle
Last April (2002), in Portland, 10 year-old Chase Willson (1224) was paired against Michael Thaler, Hunter College Elementary School in New York, who sported a strong 1855 rating! That Chase would walk away from this game with an upset win is notable, but after studying this game one can see that for entire stretches Chase played like an expert. Playing the black side of a Sicilian Smith-Morra Gambit Declined, Chase makes an error at move 10 which costs him a pawn and his ability to castle. Chase's 12th move (12. ... e5!) shows that he was up to the challenge. Next it is white's turn to err (14. f4?), which loses the exchange and weakens White's game. Chase deftly attacks and defends at the same time, and his play lends a touch of class to the game that leaves us with the moral that: no matter how much higher your opponent is rated, play your best and stay focused and you can win the contest.
NATIONAL ELEMENTARY CHESS CHAMPIONSHIP
Portland, Oregon April, 2002
White: Michael Thaler (1855) Black: Chase Willson (1224)
SICILIAN DEFENSE; SMITH-MORRA GAMBIT DECLINED
| White |
Black |
| 1. e4 | c5 |
| 2. c3 | Nf6 |
| 3. e5 | Nd5 |
By playing 2. c3, White deprived his own Knight of the c3 square. Chase's playing 2. ... Nf6 directly attacked the e4 pawn, and while White could have responded in other ways. The fact that he played 3. e5 tends to indicate he was hoping for a Smith-Morra Gambit, which usually goes as follows: 1. e4 c5 2. Nf3 Nc6 3. d4 cxd4 4. c3. Here, if Black replies 4. ... cxd3, the opening is the Gambit, named for the two men who did much of the research into this active opening. For his extra pawn, Black must undergo an attack. Many players of the Black side of this opening, however, are not willing to suffer the pounding to which White can subject Black, so they will instead "decline" the gambit pawn, and play instead ... Nf6, attacking White's e4 pawn. The e4 pawn then advances to e5, causing Black to play his Knight to d5, which is in fact the very direction this game takes. The fact that Chase never takes the pawn at c3 gives him a more active game, and reduces White's attacking chances.
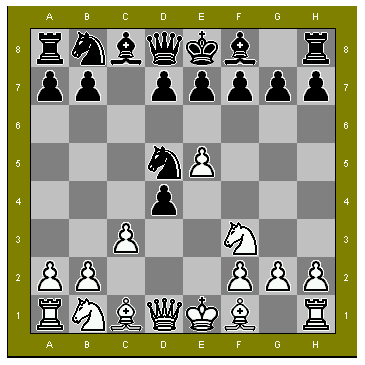
Position after 5. Nf3
Notice Black could not play 5. ... dxc3 because of Qxd5. Chase's move, 5. ... Nc6 is exactly right.
| 6. Bc4 | Nb6 |
| 7. Bb3 | d5 |
| 8. exd5 ep | Qxd6 |
| 9. 0-0 | Bg4?! |
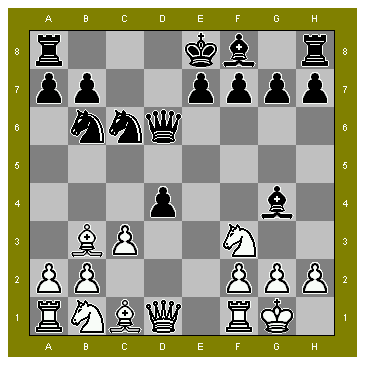
Position after 9. ... Bg4?!
Here, instead of this move, most masters choose to challenge White's Bishop on b3 with 9. ... Be6. There can follow: 10. Bxe6 Qxe6 11. Nxd4 Nxd4 12. Qxd4 Qe2 13. b3 e5, as in Malisauskas-Vidmanta, the Netherlands, 1990. That game was drawn after 24 moves.
If Black instead plays 10. ... Kd8, Peter-Murphy (Hungary, 1993) went: 11. Bb3 Ne5 12. Nxe5 Bxd1 13. Nf7 Kd7 14. Nxd6 Bxb3 15. Nf5 Bd5 16. Nxd4 e5 and White won in 38 moves.
Or, Black can try 12. ... d3 13. Re1 Nd5 14. Ne4 Qd7 15. Qh5 Kd8, as in Paul - Orlando, Argentina, 1985. Chase's chooses an active move and this, in effect, tells White that he has a fight on his hands.
| 13. cxd4 | Nxd4 |
| 14. f4? | ------ |
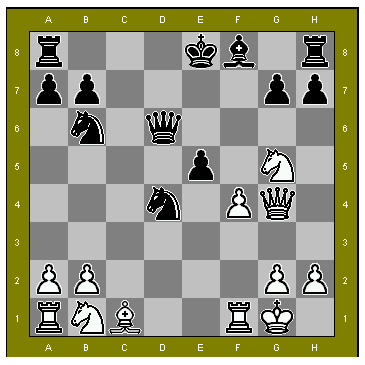
Position after 14. f4
Now it is White's turn to err. White wants to open the position on Black's King along the f-file, but he should instead play 14. Nc3, developing a piece. The other problem with f4 is that it is unneeded. Black already can't castle, and White would do better to develop all his pieces and get his Rooks moved to the central files. In addition. Black will win a Rook for Knight.
This move holds everything. This is the move White overlooked when he played 14. f4.
| 16 Qxe5+ | Be7 |
| 17. Ne6 | Kf7 |
| 18. Ng5+ | ------- |
Or, White could trap Black's Queen, at a cost: 18. f5 Qf6 19. Qe2 Nxa1 20. Bg5 Qxg5 21. Nxg5 Bxg5 22. Qh5 Kf6 23, Qe2 and White has the advantage.
If 18. ... Bxg5 instead, 19. fxg5+ Kg8 20. b4 Re8 21. Qc3 Nxa1 22. Qxa1 Qe4 23. Qb2 Nd5 with advantage to Black.
Also to be considered was 19. ... Nd7 20. Qe2 Nxa1 21. Re1 Qf6 22. Be3 Nb3 23. Qxb3 Kf8 and Black has a good game.
Or 20. ... Kf8 21. Ne6+ Kg8 22. Nec7 Bf6 23. Qe6 Qf7 24. Qxf7+ Kxf7 25. Nxa8 Rxa8 26. Nd6 Kg8 27. Nxb7 Bd4 28. Kh1 and Black can rescue his Knight.
| 21 Nxa7 | Nd7 |
| 22. Qe2 | Qb6+ |
| 23. Be3 | Rc2 |
| 24. Qf3 | ------ |
Instead of 24. Qf3, White could have played 24. Qh5+ g6 25. Bxb6 gxh5 26. Bf2 Rxf2 27. Kxf2 Nc2, but Black remains on top. Obviously, White did not want to give up his Queen!
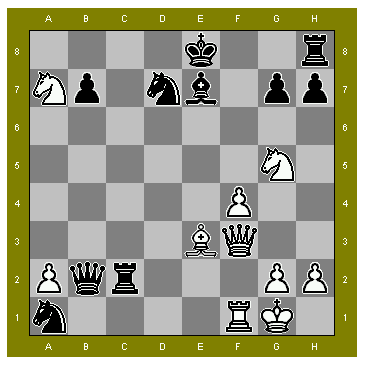
Position after 24. ... Qxb2
The smoke has cleared somewhat, and now we can look at the position. Currently, White has an extra pawn but is "down" a Rook. He hopes, however, to take Black's Knight at a1, and get at least that much material back. On the other hand, his Knight at a7, while safe, is pretty much trapped and is out of play. Black has a powerful invasion on White's Queenside, with a Queen and Rook on the 2nd rank. Black is also looking for a way to activate his Rook on h8. Black's King is unable to castle, and he is stuck in the middle of the board. White's King should move off the potentially dangerous a7-g1 diagonal. All in all, Black stands much better. White's pieces are not well positioned to take advantage of Black's exposed King, and he must guard too many weaknesses.
Attempting to get the Rook into play. Perhaps even better might have been 26. ... Nxe4 27. Qxe4 Qxa2 28. Nb5 Re2, holding everything.
| 27. Bd4 | Qxa2 |
| 28. Rxa1 | Qc4 |
| 29. Qe3? | ------- |
This move loses for White in several variations. White was perhaps hoping that on the next move he could play 30. Nxd6, forking the King and Queen. Chase, however sees this, and avoids it. White would have done better to trade off Black's Knight with 29. Nxf6+.
This take's White's Queen away from protecting his c1 square.
| 30. Qxe4 | Rc1+! |
| 31. Rxc1 | Qxc1+ |
| 32. Kf2 | Qxf4?+ |

Position after 32. ... Qxf4?+
If Black played instead ... Rxf4+, White's Queen would be immediately lost, and White would most likely have resigned here. Both sides must have been in time pressure.
| 33. Qxf4 | Rxf4+ |
| 34. Ke3 | Rf5 |
| 35. Ke4 | g6 |
| 36. Nc8 | Kd8 |
| 37. g4 | Rb5 |
| 38. Nb6 | Bc5 |
From here it is mostly a matter of "technique" for Black to win, but Black must still be very careful and exercise caution. Note how White has moved his King to the center of the board, and tries to keep Black from advancing. White also tries not to trade material, for this would only help Black simplify his win. Chase, however, by playing 38. ... Bc5, will try and force the exchange of material. Then, it will be a matter of advancing his passed b-pawn.
| 39. Bf6+ | Kc7 |
| 40. Nd5+ | Kd7 |
| 41. Be5 | Be7 |
| 42. Kd4 | b6 |
| 43. Kc4 | Rc5+ |
| 44. Kd4 | b5 |
Chase has carefully woven his game to the point where White can no longer hold him back. The advancing pawn will cause White to have to give up material, after which Black will penetrate and finish the game for good.
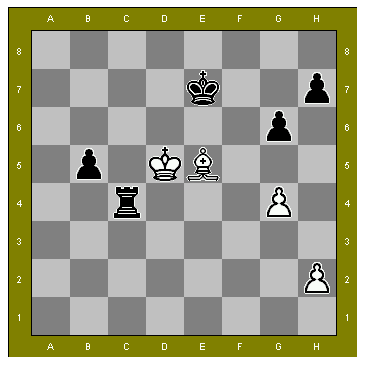
Position after 46. Kxe7
White keeps hoping Black will blunder. Here, Chase's Rook keeps the White King from coming over to attack the advancing b-pawn, which means it will be up to White's Bishop to carry the load of stopping the pawn, and keeping the Black King from penetrating into White's pawns. This will be too hard for White's over-worked Bishop to do! Chase now quickly moves to put White out of his misery.
| 47. g5 | Rc2 |
| 48. Bd6+ | Kd7 |
| 49. Bb4 | ------- |
White's position is broken. The Bishop must abandon the poor White h-pawn because it cannot allow Black's b-pawn to advance any further.
| 49. ----- | Rxh2 |
| 50. Kc5 | Ke6 |
| 51. Kxb5 | Rb2 |
Ouch! With two connected pawns v. a single pawn on the Kingside, Chase will take White's g-pawn and march one of his own pawns onward, and White will only be able to watch, helpless.
| 52. Kc4 | Rxb4 |
| 53. Kxb4 | Kf5 |
| 54. White Resigns | |
An exciting game! Chase Willson was cool under fire, and did not let the fact that he was playing such a highly rated player intimidate him. Black showed good opening preparation, and executed the endgame in excellent style.
Return to Spotlight Page